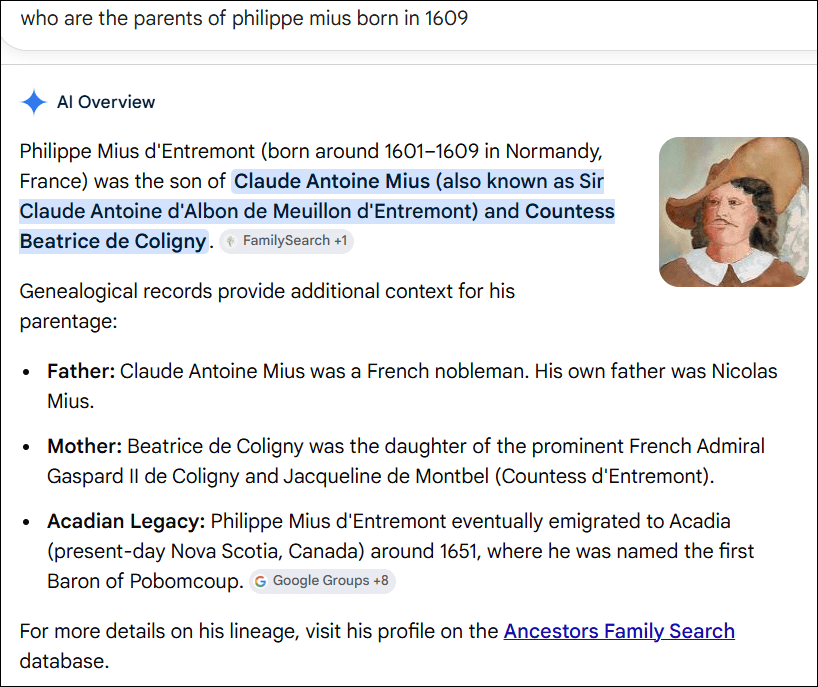
We don’t know her name.
More than three centuries after her death, she remains elusive and mysterious. No known records reveal her identity. Yet, she appears in the shadows, waiting for us to find her.
She’s Philippe Mius’s first wife. For a long time, that was all we knew. Little by little, we add pieces of evidence.
We must reconstruct her life indirectly. Her life story begins to come into focus through the history of the Mi’kmaq people, Philippe’s life, the lives of her children and descendants, and her mitochondrial DNA.
Most unnamed women disappear completely from history. We’re not letting her do that.
Philippe’s First Wife
Evidence shows that Philippe Mius d’Azy had at least two wives. He had five children born between 1679 and 1684. In the 1686 census, he was living in Port Royal with his father and without either a wife or children. Beginning about 1687, he had additional children with a Native woman named Marie, born about 1670, who was too young to have been the mother of those earlier children.
We know that Philippe lived most of his life among the Mi’kmaq people. The only exception seems to be that 1686 census.
The mitochondrial DNA results from the descendants of daughter, Francoise Mius, and her older sister, Marie, fall into haplogroup X2a2, which is unquestionably Native American. Their mother, Philippe’s first wife, is the woman who remains nameless and about whom we are writing.
There is confusion about the haplogroups of the children from Philippe’s second wife, which is probably a result of confusing genealogy. It doesn’t help that he had daughters named Marie and Francoise with both wives.
To learn more about the mothers of Philippe’s children, we would need mitochondrial DNA tests from the direct matrilineal descendants (female to female to the current generation, which can be male) of each daughter with solid genealogical trees back to Philippe’s daughters, who are:
- Marie Mius born about 1680, married Francois Viger about 1697. They lived among the Native people at Quimakagan, present-day Robert’s Island, in 1705 when they had their children baptized in Port Royal. They are living at “Cap Sable” in 1708. It’s unclear where they lived after that.
- Francoise Mius born around 1684, married Jacques Bonnevie, a French soldier. We have her mitochondrial DNA and she matches several other people who descend from Francois and her sister, Marie, born in 1680.
The 1686 census where Philippe Mius is enumerated with his father in Port Royal.
- Marie Mius, born about 1689, married Jean Baptiste Thomas, who was a Mi’kmaq chief in 1726.
- Madeleine Mius, born about 1694, married Jean-Baptiste Guedry before November 1708. They lived among the Native people at Merligueche, present-day Lunenburg, and La Heve.
- Francoise Mius, born about 1697 in La Heve, married an unknown man about 1717, and Pierre Celier about 1733, where she is noted as being from La Have. No documented children.
- Anne Marie Mius, born about 1705 in Merleguiche, married Paul Guidry/Guedry about 1720, and lived among the Native people.
One of the reasons that we believe Philippe had two wives is that the names of the first two daughters are also included in the second group of children who were born after the 1686 census, where Philippe is living in Port Royal.
Furthermore, his “second wife,” Marie, was born about 1670, so she was not old enough, based on her reported age of 38 in the 1708 census, to be the mother of Philippe’s first child, Joseph, born about 1679.
I have not listed Philippe’s sons, above, as they are not relevant to his wives’ mitochondrial DNA. Males don’t pass their mitochondrial DNA on to their children. Only females do. However, there were no known children between Francoise in 1684 and a son born about 1688. In other words, it appears that his first wife died between 1684 when Francoise was born, and 1688 when his next child was born.
Sadly, she would have died quite young. Probably just 21 or 22.
Aside from mitochondrial DNA testing for Philippe’s first wife, which we have today, the original information that both of Philippe’s wives were Native comes from a letter from a priest to his bishop, documented in the late Stephen A. White’s book, Dictionnaire généalogique des familles acadiennes, and reported on WikiTree, stating:
Unknown Amerindien married about 1678 and (married) Marie Amerindien married date unknown (to) Phillipe d’Azy Mius.
Unfortunately, the date of the letter is not known, but there’s no reason to doubt the authenticity of the information.
In addition to that, in the 1708 Indian census, Philippe Mieusse, age 48, is living with his wife, Marie, age 38, and their children, beginning with their oldest son, Jacques who is 20. The location is “Indians from La Heve and surrounding area.” This tells us that Philippe has been living among the Native people for more than 20 years, or since 1687 or so. Most people have French first names, which suggests they have been baptized, but Native surnames.
Early European Encounters
We know frustratingly little about Philippe’s first wife. However, we do know a great deal about the world in which she lived. To understand her life, we need to understand the Mi’kmaq people among whom she was born, raised, married, and ultimately buried.
We may not know her name, but we can reconstruct her world
How did the history and relationship between the Mi’kmaq people and the French evolve? While Philippe’s wife hadn’t been born yet when that relationship began, it profoundly influenced what happened over the next century.
In 1604 and 1605, Pierre Dugua, Sieur de Mons, along with cartographer Samuel de Champlain, explored Nova Scotia and the surrounding region.

DeMons established the first mill on the Lequille, now Allain River, above Port Royal, where a replica stands today, and a habitation or fort was designed by Champlain and built across the river.

On Champlain’s map, you can see the mill in the bottom right hand corner, labeled with letter “I”, or roman numeral “1.” I’m not sure which it is. Across the river, the habitation is labeled by “X.”

The original habitation was burned in 1613 by English raiders from Virginia, but a faithful reproduction has been built to welcome visitors and demonstrate life in an early French fort in Nova Scotia, where trading took place with the Mi’kmaq people.

Trading between the French and Native people took place at the habitation.
Marc Lescarbot, a lawyer and one of the earliest French explorers, first wrote about the Mi’kmaq in 1606, recording details of their daily life. It’s interesting that he recorded that the Mi’kmaq greeted the French and Basque traders by saying “Nikmaq!”, meaning “my kin-friends” or “my brothers” and the French referred to the Mi’kmaq as their “nikmaqs.”
He was particularly impressed by their welcoming nature, recording in his diary that they warmly greeted any stranger who was not a known enemy, and possessed “mutual charity” towards others. Resources, including food, were shared with their entire community to ensure survival.
During a time when Native people were often viewed as savages, or worse, by Europeans, Lescarbot said that they were highly intelligent, had “deep eloquence” of speech along with “much judgment and good sense.”

The French were particularly interested in furs, which were harvested primarily in the winter. Initially, the Mi’kmaq people only hunted enough animals to address their immediate needs, so they didn’t have furs, skins, or pelts to trade – but before long, that changed.

The Mi’kmaq established a trade relationship with the French, but that led to the Tarrateen War between the Mi’kmaw and their rivals, the Abenaki in Maine. The worst part lasted for eight years, but tensions and raids persisted for more than a quarter century.
In 1606, Lescarbot and Champlain wrote that Chief Membertou held a funeral for his son-in-law Panoniac, a Mi’kmaw sakmow, or grand chief, who had been killed by a member of the Passamaquoddy tribe. Seeking revenge for this and other acts of hostility, in July, 1607, Membertou led 500 warriors in a raid on the Passamaquoddy village in present-day Saco, Maine, killing 20 of their warriors and two leaders.
Extrapolating from later census information, if Membertou had 500 warriors, that would suggest the tribe consisted of around 1,500 or maybe as many as 2,000 people – assuming he took all the warriors with him. No warrior would have wanted to be left behind.
In 1607, the French left Port Royal because King Henri IV revoked the fur trade monopoly that had been fueling the settlement. Upon their departure, the French entrusted the fort to Membertou’s care. He faithfully guarded it until they returned in June of 1610.
On June 24, 1610, Membertou was baptized in the Catholic faith as a gesture of alliance, taking the English name of Henri after the French King. However, he appeared not to comprehend the scope of what Catholicism meant. The following year, on his deathbed, Membertou stated that he didn’t want to go to Christian heaven because he wanted to be with his people. He died in September, 1611, someplace between 80 and over 100 years of age. He was reported to be between 102 and 104, but that age is greeted with some skepticism.
Although Membertou’s age is unclear, he recalled that he was a fully grown married man with a family when he met French explorer, Jacques Cartier during his first voyage in 1534. That would place his birth year well before 1514, and probably around 1504. Membertou’s son was over 60 in 1610, so we know he was at least 80.
In 1612, the Mi’kmaq raided the Abenaki villages in Maine, but tragically, they returned with a plague or illness of some sort that killed about three-fourths of the Mi’kmaq people.
In genetic parlance, this is approaching a bottleneck event, and it’s why knowing that Membertou had 500 warriors in 1607 is important.
By 1620, when the Pilgrims arrived in what would one day become Massachusetts, King James of England granted Acadia to Sir William Alexander, who named it New Scotland, the name that would morph to Nova Scotia.

Philippe Mius’s first Native wife was probably born about 1663, a few years after his 1660 birth, in the Pobomcoup areas, the region near today’s Pubnico, or in other known Mi’kmaq villages.
The Mi’kmaq people who met these early French explorers would probably have been two or three generations older than her, and there’s no evidence to indicate that she was directly or recently related to Chief Membertou.
However, given the level of endogamy that exists within a closed population, everyone in the tribe was probably related to Membertou in multiple ways. Before European arrival and colonization, there were no other people available to marry and have children with.
The Mi’kmaq were regionally migratory, semi-nomadic people, and both the Port Royal and Pobomcoup bands were part of the Gespogoitnag or Kespu’kwitk district that encompassed southwest Nova Scotia. Kespu’kwitk means “land ends” or “end of flow.”
Although trading slowed somewhat after 1613 when the English attacked and burned the fort, it didn’t stop, as the French never completely left.

In 1631, when France regained control of Nova Scotia, Charles St. Estienne de La Tour built Fort Sainte Marie at the mouth of the Saint John River, across the bay from Port Royal.
The following year, Isaac de Razilly established a fort at Le Have, and three or four years later, the first French families arrived.
In 1635, Razilly died, and Charles d’Aulnay took his place as Governor, moving the seat of Acadia to Port Royal, a more sheltered and agriculturally more productive area, between 1636 and 1640. D’Aulnay drowned in 1650.
In 1651, La Tour, the new governor, brought Philippe Mius d’Entremont (Sr.), with his wife, Madeleine Helie, and their first child, to Acadia, to be his second-in-command.
In 1653, Mius selected the area known as Pobomcoup, today’s Pubnico area surrounding the harbor, to establish his seigneury, which elevated him to the status of Baron of Pobomcoup.
A year later, 1654, the English retook Nova Scotia and retained it until 1667.

Philippe Mius’s grant area, and where he likely built his manor house near Pubnico.
Philipp Mius d’Entremont Sr. built a manor house someplace at Pobomcoup, probably within the red square above, and expanded his family.
Philippe Mius Jr., who eventually married into and lived among the Mi’kmaq, was born around 1660 in Pobomcoup. The only other residents in this remote outpost were the LaTour family, at least 22 miles away by water, and the Native people who lived at and had frequented Pobomcoup for generations.
In the 1671 Acadian census, Philippe Mius d’Entremont is shown as a child with his family, and only his family, in “The settlement of Pobomcou near the Island of Tousquet.” Their only neighbors would have been the Mi’kmaq people.
In that census, Philippe is age 11. His oldest sister has married and lives in Port Royal, his oldest brother, Jacques, is missing from the census, his brother Abraham, 13, is shown, as is his baby sister, who is 2.
Perhaps the most important thing about this census is that there are no other European children, so Philippe’s playmates, aside from his siblings, are the Native children living nearby.
Philippe’s father, the Baron of Pobomcoup, had built a manor house that would have served as a gathering place and trading post. Everyone would have come there to trade, and the Native people may have made their summer encampment nearby. Or, perhaps Philippe built his home intentioinally close to the Mi’kmaq village to facilitate easy trading.

Trade goods would have included skins in return for metal objects, specifically knives, hatchets, awls, kettles, and sometimes woven cloth.

Some skins, mostly moose and deer, were scraped with shells to remove the fur. These are beautifully painted today with paint made from natural dyes, but we don’t know whether the skins they traded then were decorative.

While not specific to Nova Scotia, French chroniclers reported stunningly beautiful painted hides, collectively called Matachees.

Within the tribe, painted objects weren’t simply decorative, but served a larger purpose, integrating spiritual protection with social identity and survival. Depending on the size of the hide, painted skins provided robes, cloaks, blankets, leggings, detachable sleeves, and of course, moccasins. Ceremonial clothing, including moccasins, were even more festive and decorative.
Additionally, painting the hide honored the animal that gave its life to feed and clothe the community’s members. Absolutely nothing was wasted.
Special occasions, like weddings, political councils, important feasts and sacred ceremonies were marked with elaborate, bleached moosehide robes that were painted with red and black ochre.
This might provide a clue about the wedding of Philippe Mius (Jr.) with his Mi’kmaq wife. I can’t help but wonder if, given his father’s status, he married a high-status daughter as well. Traditionally, Mi’kmaq marriages were family arrangements that focused on mutual cooperation, but included the consent of the bride. If the families agreed and the couple consented, they were expected to develop a lifelong bond. Did Philippe ask his father to approach her father to discuss a possible marriage? In traditional Mi’kmaq society, the young man would avoid looking at or speaking directly to his future wife until his father had spoken with hers – although no doubt there were numerous furtive glances to indicate interest combined with the local grapevine.
Philippe would have spent his formative years with the Native people mastering the skills necessary to survive in the maritime wilderness and along the shoreline.

He would have been able to handle a canoe, just like the Mi’kmaq children. He would probably not have dressed in European clothes, which would simply have been in the way.

He would have learned to find, harvest and braid sweetgrass, along with other skills such as how to construct a birchbark canoe.
The next Acadian census isn’t until 1678, at which time Philippe Mius d’Azy would be about 18. His father has been appointed as the King’s Attorney and now, the family is living in Port Royal – except – Philippe is not living with them.
He was probably living with his brothers in Pobomcoup. He may never have made the move to Port Royal when his father, as the King’s Attorney, moved, sometime after 1671.
It’s not surprising that Philippe, who came to be known as Philippe d’Azy as his dit name, would marry into the Mi’kmaq tribe. I’m referring to him by “d’Azy” to differentiate him from his father at this point.
The Mi’kmaq have fished at Pobomcoup from time immemorial, and the word Pobomcoup is taken from their language, meaning something similar to, “Place where we drill holes in the ice to fish.”
Philippe grew up with only his siblings and the Mi’kmaq children as playmates. He would have learned to hunt and fish with the boys, and when old enough, clearly a young lady caught his eye.
Philippe may have been missing in the 1678 census because he was living with his future wife’s parents, performing the trial of “bride-service.” A suitor typically lived with the bride’s parents for some time, up to a year, before a wedding was agreed to, demonstrating that he could hunt and work sufficiently to provide for the daughter and his own household.
Given the status of Philippe’s father, this arrangement could have been somewhat different. He would still have been expected to gift her parents with beaver pelts and other goods.
Weddings were communal, celebratory feasting events. People ate blueberries and meat, sang traditional songs, and danced in ceremonial regalia. Sacred rituals would have included smudging with sweetgrass, a sacred pipe ceremony, and tying a feather to the side of each other’s heads – an act equivalent to contemporary wedding rings.
To close the ritual, the couple was wrapped in a single blanket, symbolizing both visually and spiritually their new life together and the journey they were undertaking as a single unit.
Weddings bonded more than the couple, they formed alliances between families and sometimes villages.
In this case, they symbolically connected both worlds.
We do know that these traditions continued despite Catholic conversion. The Mi’kmaq eventually blended aspects of both.
Philippe and his wife probably married at Pobomcoup, since that’s likely where they met. It would be interesting to know if both families attended, or how they handled the very different European and Mi’kmaq traditions and expectations.
The only way we know where Philippe d’Azy was and what he was doing with his life is by piecing his life together, and by extension his wife, the Mi’kmaq mother of his children.
Let’s see what we can infer about her life from his story and the lives of their children.
Philippe d’Azy’s mother died between 1677 and 1678, probably in Port Royal given that’s where his father and younger siblings were living in 1678.
Based on the birth year of their oldest child, named Joseph d’Azy Mius, around 1679, Philippe d’Azy had married a year or so earlier.
Philippe was young, only about 18, so his wife was probably around the same age, or perhaps slightly younger. Based on the ages of the Mi’kmaq women in the 1708 census, 15 or 16 seems to be the most common marriage age, so let’s say that in 1678, Philippe’s bride was 15 or 16, so born about 1662 or 1663.
We have absolutely no idea what her name was, but it could have been either Marie or Francoise, because her two daughters were given those names, in that order.
I feel badly that I have to refer to her namelessly, but I’m not going to “assign” a name, because that’s how incorrect names become part of legend. We already have that problem with Philippe’s second Native wife, Marie, who, at some point got labeled with the surname CoyoteWhite or Coyote Blanc. Nope, no documentation whatsoever to support that.
Philippe’s oldest children, born prior to 1686, so to his first wife, were:
- Joseph Mius born about 1679 and married a Native woman named Marie about 1699
- Marie Mius born about 1680 and married Francois Viger about 1697
- Mathieu Mius born about 1682 and married a Native woman named Madeleine about 1706
- Maurice Mius born about 1682 and married a Native woman named Marguerite about 1702
- Francoise Mius born about 1684 married Jacques Bonnevie, a soldier, about 1701
It’s presumed that the woman Philippe married around 1678 is the same woman who gave birth to Francoise about 1684, but that could be in error.
It’s possible that Francoise’s older siblings had more than one mother, but it’s unlikely given that descendants of both Marie born in 1680 and Francoise born about 1684 carry Native American haplogroup X2a2 and match exactly.
However, given that we know there weren’t many Mi’kmaq, and that they had survived at least one bottleneck event in 1612, Marie and Francoise could possibly have the same haplogroup and not share the same mother. In other words, their mothers could be siblings, cousins, or otherwise share the same direct matrilineal line ancestor.
I would also assume that because all five children have “French” first names that they were baptized at some point, either at birth by Philippe, who we know baptized children born in 1702 and later, or by a visiting missionary priest.
The children probably also had Mi’kmaq names used within the family and community.
We also know that Marie was a favorite Catholic name, as in Marie, the mother of Christ.
When Mi’kmaq people were baptized, they were given European, in this case, French names, so Philippe’s wife probably had a French biblical name. For that matter, we really don’t know if Philippe’s family was Protestant or Catholic when they arrived in Acadia. The La Tour family was Protestant. Eventually, the Mius family was Catholic, certainly before 1702, but we don’t know when that occurred.
There are no parish records prior to 1702. Earlier records were lost or destroyed.

Their first child, Joseph Mius was born around 1679, probably in or near Pobomcoup, the general area surrounding Pubnico Harbour today.
Joseph, like his father, lived among the Native people.
The 1708 Indian Census
The November 1708 census is known as “The Indian Census” and lists the Mi’kmaq people by location, name, age and by wigwam. This is the only census in which at least some are listed by their Native names. The census records all of the Indians who reside on the coast of Nova Scotia, including Port Royal and along the western and southern coastlines, plus at Pintagouet (Castine, Maine) and Canibeky (the Kennebec River area). It includes a summary of the number of men and boys capable of going to war, meaning those 15 or older, which may have been the motivation for taking the census in the first place.
The Indians at Port Royal include several widows and orphans, for a total of 102 people. Cape Sable has 97 people. Port Razoir has three families with 15 people. La Heve has 127 people. Les Mines has 59 people. Mouscoudabouet has 196 people. Chiguenictou has 100 people.
There’s a note that the Indians of Pintgouet were enumerated by wigwam and not by family by Father de la Chasse, their missionary. Twenty-six wigwams housed 388 people, or about 15 people per wigwam.
This is probably insightful as to how Philippe’s wife’s family lived, and how they lived together after they married. Communal living would explain why, after Philippe’s wife died, their children were raised by their Native relatives, not taken by their father to Port Royal in 1686. Philippe must have been utterly miserable there, because he was gone soon after.
Another note says that the Indians from Canikeby were not in their villages, so the census-taker could not know the names of their family members or the number of children, they “being sometimes in Canada and sometimes on the other coast.”
On the St. Jean River, they counted only the 82 men and boys capable of carrying arms.
The “Indian Census” totaled 1305 people, with 439 being classified as “warriors”. That’s not very many people. I wonder how many there would have been if three-fourth of their population hadn’t perished a century earlier. For adults old enough to have completed their family, the number of surviving children seems to be someplace around four. That means their population roughly doubled in every generation.
Backing the census number up by generation, there would only have been about 650 people in 1673, 35 years, or a very long generation, earlier, and about 325 in 1638. The plague occurred about 1612, which tells us that the population was probably reduced to around 165 people, or maybe between 165 and 325. This is close to our earlier approximation of about 1500 people before 75% died, which would have left about 375.
Some estimates of Indigenous “plague deaths” between 1612 and 1619, known also as “The Great Dying”, reach as high as 90-95%. Given that the affliction did not seem to affect the French fishermen, it was likely a result of exposure to European diseases, or the disease carried by the rats on their ships. Unfortunately, the Europeans viewed this unfortunate epidemic as “God’s hand” in freeing up the lands for European colonization.
It’s hard to imagine that only around 300 people, or maybe even fewer, stood between the Mi’kmaq and extinction.
Perhaps their scattered locations along the coastline, as reflected in the 1708 census, helped to save them.
Under the title, Cape Sable Indians, which is not close to La Heve where Philippe and his second wife are living, we find:
- Mathieu Emieusse, 26, Madelaine, 20, with Joachim, 1
This is Mathieu, born about 1682, Philippe Mius d’Azy’s son with his first wife.
Under the title, Indians from La Heve and surrounding area:
- Philippe Mieusse, age 48, is listed at Le Have and surrounding area in the 10th wigwam, with his wife, Marie, age 38, son Jacques 20, son Pierre, 17, son Francois, 8, son Philipe 5, daughter Francoise, 11, and daughter Anne, 3.
This is Philippe Mius d’Entremont Sr.’s son, Philippe Mius d’Azy, born about 1660, living at Le Have, with his second wife, Marie, a Mi’kmaq woman.
Under the title, Indians from Mouscoudabouet:
- Maurice Mieuse, age 26, is living with his wife Margueritte, 27 and their two children in the 5th wigwam at Mouscoudabouet.
Mouscoudabouet was an early combined French and Native settlement located about 80 miles northeast of La Heve by water, about 20 miles further east of present-day Halifax.
Maurice, born about 1682, is Philippe d’Azy’s son with his first Native wife.
Following that, we find a list of “the French settled on the East Coast – the French of Cape Sable.”
The couples, with the spelling remaining unchanged, include:
- Julien auboiss, 67, and Jeanne aimee, 45
- Gabriel mouleson, 23, and Marie aubois, 22
- francois Vige, 46, Marie mieusse, 28
Marie is Philippe’s daughter by his first wife, who married Francois Viger. This suggests her birth about 1680.
- Francois Tourangeau, 66, Marie Pitre, 42
- Marc Pitre, 37, Jeanne brun, 36
- Joseph dazy, 35, Marie tourangeau, 24, with son Joseph, 8, Charles, 6, francois, 5, Angelique, 4, Marie Joseph, 2
This is Joseph, born about 1679 (although this subtracts to 1673), the son of Philippe Mius d’Azy with his first wife. In 1715, Joseph received land, where he is described as “part Indian who dwelt at Port Le Tore,” and is the son-in-law of “Tourangeaut”. In this census, Tourangeaut is probably Francois Tourangeau, with his wife Marie Pitre.
- Jean Pitre, 33, francoise Babin, 25
At Port Rasoirs:
- Claude Bertram, 50, Catherine Pitre, 40
- Etienne Chicau (no age or other people)
- Jean Guy, 70, Marie Lureau, 40
At La Heve:
- Pierre Briart, 55, Marie Thibaudeau, 46
- Joseph Boutin, 32, Marie Briart, 22
- Martin Briart, 5, Marie Godet, 28
- Jean Godet, 58, Jeanne Briart, 62
- Rene Labauve, 30, Anne Briart, 21
- Jean Petit, 58, Jeanne Fauueau, 60
- Claude Guedry, 60, Marguerite Petit pas, 48
- Jean baptiste Guedry, 24, Madelaine Mieusse, 14
Madelaine, born about 1694, is the daughter of Philippe and his first wife.

In 1726 Jean Baptiste Guidry, and his namesake son, who was about 16, were both kidnapped by the English in the harbour at Merligueche, present-day Lunenburg, and hanged for piracy in Boston, on November 13, 1726. Philip Mius d’Azy’s son, Philip, about age 23, by his second wife, Marie, and his son Joseph from his first marriage, about age 53, were also kidnapped and hanged on the same day.

They had all probably been living as a family, here, at Merligueche.
Philippe d’Azy was still living at that time, although I wouldn’t be surprised if losing two of his sons, his son-in-law, and his grandson killed him. We never find him again in any record. He would have been about 66.
Philippe’s first wife, whoever she was, had “walked on” some 40 years earlier and was waiting to greet and comfort her son, Joseph Mius d’Azy, his half-brother, Philippe Mius d’Azy, her son-in-law Jean-Baptiste Guidry and grandson, also Jean-Baptiste Guidry.
Say their names.
While their death was astoundingly tragic, traditional Mi’kmaq belief is that death is a natural transition, and one’s ancestors are waiting to guide and embrace those who are passing into the spirit realm where the spirit lives on.

In the 1708 Indian Census, Philippe’s children were scattered over 300 miles along interlinked coastal villages in the southern and southwestern portion of Nova Scotia, and Philippe Mius d’Azy’s fifth child, by his first wife, Francoise, had married Jacques Bonnevie about 1701 and was living at Port Royal.
Even though these families lwere enumerated far apart along the coastline, they clearly sailed back and forth, given how many were in the same place on that fateful day in 1726. Various records place Philippe along a very long stretch of coastline throughout his life – all the way from Port Royal to Musquodoboit Harbour.
Francoise Mius is the only one of Philippe’s first Mi’kmaq wife’s children who did not retain a Native lifestyle and live among the Native people as an adult. Born about 1684, she and Jacques Bonnevie, a soldier, lived with their family in Port Royal among the French families.

Courtesy Nova Scotia Archives
Prior to that, Francoise is not found in the census, so would have been living among the Mi’kmaq.
Given how scattered the family is in 1708, it’s impossible to tell whether Philippe lived at Pobomcoup or elsewhere along the coastline with his first wife. They were only married for six or 7 years before she passed on – but that was half a dozen summers and winters where they would transition from their summer village to a winter location.
The Mi’kmaq people led a lifestyle in tune with nature, moving to where hunting and fishing were abundant and where safe shelter could be found during the various seasons of the year.
The Mi’kmaq people were seasonally migratory and moved from place to place.
Their wigwams, consisting of five or six poles, lashed together and covered with birch bark sewn together with spruce were easily assembled in less than a day by the women. Floors were covered with boughs, animals skins and furs.
The Mi’kmaq had few personal belongings, but they packed up their wigwams and hunting tools each season as they moved to the next location.
They lived in villages near Canso, Rivere Sainte Marie, Chebucto, La Heve, Port Medway, Port Rossignol (Shelburne), Ministiguesch (Port La Tour), Merligueche, Ouimakagan (near Pubnico), and other locations. For a more detailed discussion of their village sites, see Bill Wicken, “Encounters with Tall Sails and Tall Tales: Mi’kmaq Society, 1600-1760”.
The Port Royal Parish Register
The Port Royal parish register, on October 22 and 23, 1705, shows that several mixed Native/Acadian children were baptized who had previously been baptized at Cape Sable, or nearby. Residences of their parents include Outkrukagan, Pombomkou, Puikmakagan, OneKmakagan, Mirliguish, Petite Riviere, Merligueshe, Port Multois, and Kayigomias.
This cluster of 1705 baptisms within a day or so of each other makes me wonder if there was some kind of community baptismal event where everyone who wanted their child officially baptized climbed into a canoe or fishing boat and set out for Port Royal, where they had access to a priest. Conversely, the gathering could have been a harvest festival, Mawio’mi (powwow), or celebration of some type. One thing is clear, lots of non-resident people were visiting Port Royal that weekend and they probably didn’t visit regularly since the children being baptized were born across several years.
Conversely, it’s also possible that the priest visited Pobomcoup or someplace along the coastline and baptized everyone there, recording the events in the parish register. Have church will travel!
Many people were recorded with place names as their surnames, like Anne de Pobomkou.
There was only one Catholic church on the western shores of Acadia – at Port Royal. We know that children were born elsewhere and baptized at birth by someone nearby when no priest was present. Sometimes, they were later baptized by a priest and the baptism was recorded in the parish register.
It’s interesting that “Philippe de Pobomkou,” who signed as Philippe Muis, baptized children in 1702. This identifies him, but it may also indicate where he’s living at that time. Or at least during that part of the year in 1702.
- In 1704, Philippe’s daughter, Francoise, the one born in 1684, had a child baptized where her name is recorded as “Françoise Muis dit Beaumon.” Her husband, Jacques Bonnevie, was a soldier.
- In February 1708 Francoise Mius the wife of Baumont stood as Godmother to a baptism.
- In June of 1712, Jacques Mius de Pobomkou and Agathe de la Tour stood as godparents at a baptism, both French who lived at Pobomcoup. This is Philippe’s brother and his wife.
- In 1730, a baptism took place at the house of “Sieur Poboncour at Cape Sable”, which would be Philippe d’Azy’s brother, Jacques, where Joseph Mieux was listed as deceased. Joseph was one of the men hanged in 1726 in Boston.
Some years ago, Fran Wilcox extracted the Mi’kmaq marriages from the parish registers of St. Jean-Baptiste Church of Port Royal, and they are published, here.
Many of the Native people are listed under the French names they adopted or were bestowed upon them at baptism, along with their family members.
The balance of Mius family records, meaning those not shown above, seem to be from Philippe d’Azy’s marriage to his second wife, although I can’t identify everyone. There is obviously a deeper history, and perhaps more children and grandchildren, than we’ve been able to document.
Some families can be correlated to the 1708 Native census, but others are mysteries.
- On June 20, 1726, Marie, the wife of Francois Mieux, Philippe’s son by his second wife, stood as a godmother. Marie has no surname, which, based on other entries, probably indicates that she is Native. Francois was appointed by the French in 1742 as Chief. He lived at Merligueche but in 1761, he signed as chief of the Indians at La Heve. This probably reflected seasonal travels.
Some baptisms and marriages state that some of the people involved were “Mi’kmaq of Cape Sable.” However, that does not mean they stayed in one place from season to season.
- In March 1728, Gabriel Thomas was baptized. He was born to Jean Baptiste Thomas, a Mi’kmaq “of this river” (Annapolis River), and mother, Marie Mius (daughter of Philippe Mius and his second wife, Marie). Francois Mius, Marie’s brother, and Anne Thomas, the daughter of Jean Baptiste Thomas, stood as Godparents.
- In February of 1730, Marie, the 30-year-old wife of Jean Baptiste Mius, of the Mi’kmaq Nation was buried. This would be very young for the Jean-Baptiste Mius born in 1713, the son of Joseph Mius, to have married, but I don’t know of other candidates.
- In October 1732, a baptism of a Mi’kmaq child was witnessed by Charles Amiraux and Claire Mieux, relationship not stated. Claire’s identity is unknown.
- In April of 1733, Marie Mieux is noted as a Mi’kmaq mother. Husband Baptiste Thomas, daughter Clere born in 1732 and baptized. Marie Mieux is Philippe’s daughter with his second wife, Marie. Jean-Baptiste Thomas was a Mi’kmaq man and future chief of the Mi’kmaq “of the river at Port Royal” in 1726.
- In April of 1734, a Mi’kmaq child was baptized with Madeleine Mius listed as the Mi’kmaq mother, along with Baptiste Pierret, a Mi’kmaq father.
- In August 1735, Francoise Myus, widow of the second time of the late Rene grande Claude of La Heve, Mi’kmaq bride, married Pierre Ceiller, a Mi’kmaq from the Annapolis River. This Francoise is the daughter of Philippe and his second wife, Marie.
Robichau family members witnessed many of these events
Philippe’s Wife’s Death
We don’t know when Philippe’s first wife died, but she had her first child, Joseph, in 1679 when they were newlyweds, followed by Marie in about 1680. Mathieu and Maurice are estimated to have been born about 1682 and may have been twins. Finally, Francoise was born about 1684, but assuredly before the census was taken in 1686.
If was born about 1663, married in 1678 at 15, and had her first child the following year – she would have only been about 21 when daughter Francoise was born in 1684. We don’t know exactly when she died, but it could have been anything from Francoise’s birth to the 1686 census where Philippe is found in Port Royal with his father.
Given that there is no child, or no child that survived in 1685 or 1686, and Philippe remarried sometime in 1687, she probably died in 1684 or 1685, leaving her five children behind. It’s certainly possible that she died in childbirth with the next child, who also perished along with her.
Communal living makes so much sense in circumstances like this.
What do we know about her short life?

From 1679 until 1685, Philippe was engaged in the fur trade and eel fishing at Ouikmakagan, a summer village on or near Robert’s Island, an eel-fishing settlement near the Tusket River.

The Mi’kmaq people fished for whales and porpoises along the shore, and gathered shellfish.
This is also where their eldest daughter, Marie, lived with François Vignee (Viger), so this must have been very familiar territory.
During those years, before her passing, Philippe’s first wife would have resided here with him, among these pristine islands, moving seasonally, as was the Mi’kmaq tradition.
We also know that in 1685, Philippe lived in a town called Ministiguesche, a native village, with his brother Abraham, near present-day Barrington Head. Barrington Head is near Fort LaTour, and Abraham married a LaTour.
That makes sense, as Ministiguesche wasn’t far from Pobomcoup, may have been in or near its eastern boundary, and was the known site of a Mi’kmaq village. Philippe’s wife would have accompanied him here, too.
The two cultures coexisted harmoniously, with the French settling the salt marsh lands, and the Mi’kmaq people living along the coastline in the summers, then in the woods and uplands in cold weather. They hunted and fished together, sharing the bounty of the woods and sea, and intermarried.
Given that the Mi’kmaq moved from place to place with the seasons, we don’t know when or where Philippe’s wife perished.
We presume that she was deceased before 1686 when Philippe was living with his father, also a widower, in Port Royal. I know how much trouble “presume” can get a genealogist into. However, I doubt that he would have left his family otherwise. Perhaps after her death, he decided to try living in the white world again. Based on what we know about Philippe, I’d wager that he was very unhappy there.
By 1687, he was on a trader’s list of European men in Indian villages, and his next child, born to Marie, arrived the following year.
Mi’kmaq Life
During my visit to Nova Scotia in the summer of 2024, I returned home to the sacred places of my Mi’kmaq ancestors.
No story of the Acadians would be complete without the Mi’kmaq people, so every museum includes documentation and references to the Native people and the role they played in Acadian settlement. The Mi’kmaq people lived throughout Nova Scotia for thousands of years.
Two locations were devoted to telling the story of the Mi’kmaq people, by the Mi’kmaq people themselves. Kespukwitk is the entire SW Nova Scotia region in the Mi’kmaq language. Today the Kejimkujik National Park and National Historic Site at Maitland tells the story of the Mi’kmaq people.
The second location is the Millbrook Cultural and Heritage Center, located on tribal land at Truro where they educate us about Mi’kmaq life.
Birth, Life and Beyond
All cultures have unique customs for commemorating life’s milestones, be they birth, coming of age, marriage or, finally, death. Some of the ways in which the Mi’kmaq observed these occasions remained unchanged for centuries. With the introduction of Catholicism, others gradually changed or died out completely.
For the Mi’kmaq, large families were means of forging alliances, and practically speaking, the more kin one had, young or old, the better. Polygamy was once common and parenting began early. Nicholas Denys, observing Mi’kmaq ways in the 1600s, remarked that, “The greatest persons give way to the little ones. The father and mother draw the morsel from their mouths for a child asks for it. They love their children greatly. They are never afraid of having too many, for they are their wealth.”
There was no pampering of expectant mothers. Writing in 1616, Father Pierre Biard noted that women gave birth outdoors and then with newborns warmly wrapped and secure inside a type of wooden backpack (a cradle board), the mothers resumed everyday tasks within hours. If a birth was particularly difficult, a shaman (puoin) was summoned to assist by blowing sweet tobacco smoke around the tree where the expectant mother stood, her hands grasping a branch.
Parents welcomed the new baby by hosting a birthing feast. The guests danced in a circle around the infant, offering up thanks and blessings. Families celebrated a youngster’s first tooth and first steps. Increasingly, after 1600, children were baptized.
A boy was considered a man when he killed his first moose. The last moose-kill feast ever held was at Shubenacadie for Max Basque in 1937. A young girl’s coming of age meant that she was ready to marry and this too was a milestone. Menstruating women retired to be alone so as to “…recite certain formularies of invocation to the Manitou …that they might obtain blessing of fruitfulness.” (Abbé Maillard, 1758)
Courtship meant that a young man and woman lived with the girl’s family for an extended period. Each demonstrated their prowess with respect to carrying out specific day-to-day tasks. The young man proved himself a hunter and fisherman and made tools, weapons, a canoe, a sled, and other items. The young woman demonstrated her butchering and cooking skills, made clothing and containers, wove webbing for snowshoes, and prepared herbal remedies.
If the twosome were compatible and the families willing, there was a wedding feast. The couple painted their faces in hues of red and blue and adorned their hair. The bride wore an elaborately-decorated white robe. There were speeches and much singing, dancing, storytelling, and eating. Festivities lasted several days.
Sadly, accidents and death occurred, although death was merely a transformation or shape-change, the last movements a passing over of protective power from one being to another. Burial customs varied and included primary burials, sky burials and secondary burials. A primary burial took place when a grave could be easily dug in a communal burying ground. The person was buried intact in either a horizontal or a flexed position.
A sky burial involved the placement of an intact body on an elevated outdoor scaffold so it could dry in the sun. This took place during winter or when death occurred at a remote place. A secondary burial meant that, following a sky burial, the bones were placed in the ground, months or years later.
Labor was divided, and everyone participated.
“The boys aid the father on the hunt and help in the support of the family. Girls work aiding the mother; they go for the wood, for water, and to find the slain animal and carry it to the wigwam. There is always some old woman with the girls to conduct them and show them the way, for often these animals are killed at five or six leagues from the wigwam and there are no beaten roads. Sometimes they camp where the animal is. They make broiled steaks and return next day.” [Adapted from Nicolas Denys, Concerning the Ways of the Indians, 1672]
Other sources tell us that the Mi’kmaq people utilized toboggans and snowshoes during the winter months, especially in conjunction with hunting.
Moose was prized, and along with any other forest animal, was a staple. Moose butter known as “cacamo” was a great delicacy made by boiling crushed moose bones in a large wooden vat. The fat was skimmed from the top of the water, congealed, and packed in birch bark boxes to be taken on hunts or given as a treasured gift. It was both high energy and portable for long hunting trips in the winter.
Salmon were speared from canoes by torchlight at night.
Brush weirs were utilized in tidal estuaries. Stakes were driven into the mud and then brush was used to make an interwoven netting, trapping fish and marine life as the water flowed out, back towards the sea.
Hooks were carved from bone and attached to moosehide lines. Larger fish were harvested using bone-tipped lances. Even larger lance-type harpoons were used to hunt seals, walrus, and small whales from seagoing canoes.
I can only imagine harpooning a whale from a canoe. The terror, but also the glory, if one was successful and did not die in the process!
The Mi’kmaq people were highly mobile and semi-nomadic, but returned to the same areas year after year, just as their ancestors had done.
Families camped by estuaries in the spring to take advantage of the spring fish runs. They moved closer to the coast in the summer to harvest cod and shellfish. Hunting in the forest took place in the fall and winter months, and fishing was done through holes in the ice.
Wild resources such as nuts and berries were harvested when ripe, and maple and birch sap were collected and boiled to make syrup or sweet drinks.
Some plants were used as medicine and others were woven into cloth. Lescarbot reported that the cloth made of hemp by the Mi’kmaq people was “finer, whiter and stronger than that of France.” Porcupine quills were used generously for decoration, and plants were used for dye.
As with many Native peoples, the Mi’kmaq were one with nature, considering many locations as sacred. The abundance of nature was understood as a gift from the Great Spirit or Creator. Nature was not a separate thing, but interwoven with them, and they with it. All was one. The Mi’kmaq people were stewards of the land and took only what was needed, wasting nothing. To do otherwise would be disrespecting Nature and the gifts bestowed upon them. Nicolas Denys kept a journal and said that they killed animals only in proportion to their need for them. As a trader, he was interested in skins and mentioned that “they never make an accumulation of skins of moose, beaver, otter, or others, but only as far as they need them for personal use.”
The Native people had no concept of “private property” as everything was shared communally, and the earth could not be “owned.” This vast difference in perspective led to many clashes and disagreements that persist to this day.
Nothing was wasted. Meat was eaten. Bones were used as implements, skins as clothing and wigwam covering, and so forth.
The Native people felt a responsibility to, and a kinship with the forest and sea animals, even those they harvested. They held the animals in great respect – thanking them for allowing themselves to be caught to nourish their bodies. It would be a “sin” of sorts to waste any part of them, or kill them needlessly, which constituted waste. Animals were considered to be persons, with souls.
The concept of massive harvesting of natural resources like trees and animals, only for their furs to be shipped back to European markets, was entirely foreign to the Mi’kmaq people.
Within a generation or so, the Mi’kmaq embraced hunting for trade, beaver was over-hunted for their lucrative pelts, and life was forever changed. Life as they knew it disappeared quickly, and with it, much of their equilibrium with Nature.
The arrival of Europeans in the early 1600s seemed innocent enough at first, but over the next few decades, the onslaught of new settlers with their very different cultural expectations and beliefs would destroy life as the Mi’kmaq people knew it.
If Philippe and his Mi’kmaq wife, whose name is unknown, welcomed their first child around 1679, based on what we know about the Mi’kmaq culture, we can estimate that his mother was maybe 16 at the time, so born about 1663.
Given what else we know about the habits of the Mi’kmaq people, and that they were know to freqent Pobomcoup, indicating that it was the place where they ice fished, it’s reasonable to surmise that area is where Philippe met his first wife. They married around 1678, probably in the Mi’kmaq tradition, given that Philippe lived among the tribe, and not the reverse where she lived among the French.
Furthermore, just a few years later when she died, their children were already an integral part of the communal family unit of their band – so taking them away from their family to be raised elsewhere by their father was simply unthinkable.
Based on Philippe’s appearance in Port Royal with his widowed father in 1686, Philippe may have tried to return to “French life,” but quickly found that he needed to follow his heart, back to nature and the Mi’kmaq people – where he remarried and lived the rest of his life.
Returning Home
During my 2024 trip back to Nova Scotia, I visited the Habitation at Port Royal, the Museum at Fort Anne, Kespukwitk and the Millbrook Cultural and Heritage Center at Truro. Each of these tells a different chapter and explains different aspects of Mi’kmaq life in Nova Scotia.

Lake Kejimkujik, today a National Park, is the spiritual center of Kespukwitk, the ancient home of the Mi’kmaq people for thousands of years, “since the beginning of time.”

Ancient petroglyphs, the traditional written Mi’kmaq language, are heavily protected within Kejimkujik.
Stone, like any other element of nature, is considered to be a living entity. Therefore, these petroglyphs are considered to be living as well, and need to be afforded respect.

Petroglyphs are found in locations across the traditional Mi’kmaq land, many disappearing due to the ravages of time. This petroglyph was part of a cliff face at Red Bridge Pond near Dartmouth, but was unintentionally displaced during road construction. It fell into a lake, then was recovered some years later and placed in a grassy area beside the road. Normally, artifacts like this cannot be moved, but in this case, given the circumstances, it was moved to the Millbrook Cultural and Heritage Center, on tribal land, for its own protection.

Upon arrival in Kejimkujik, we began in the museum where we saw a beautiful birchbark canoe.

An incredible amount of skill is required to achieve balance and symmetry when crafting these watercraft so they track straight and don’t roll over. The seams must be sealed to make them waterproof.

An inside view of the hand-hewn ribs of the canoe, with its brace. Canoes are built from the outside in, and the wood must be curved and bent without breaking. Today, locating and harvesting perfectly flawless birch trees, free of knots, is increasingly difficult due to disease, over-harvesting, and habitat destruction.

Chief Charlie Labrador was a traditional canoe builder, Elder and Spiritual Healer who lived at Kejimkujik.
You can read his interview about his younger life, his parents and grandparents, along with the traditional Mi’kmaq ways, here.

Reproductions of Native tools discovered by archaeologists.

Beautiful traditional woven basketry.

After leaving the museum, I spent some time walking along the lake’s shore, communing with the spirits of my ancestors. I can always feel them.

Anytime you see two red wooden chairs in Parks Canada, there’s something historical of interest, and those chairs are an invitation to sit and enjoy the scenery.
I was too excited to be there to sit very long.
After walking a little further, we noticed a demonstration area.

Todd Labrador, son of Chief Charlie Labrador, was giving demonstrations on traditional canoe-building – a nearly-lost art.

Todd is an incredible artist.

Todd, working in his workshop beside the photo of his grandfather, Charlie Labrador, born in 1874.

Tools lay on a table in front of another canoe underway.

I would have LOVED to bring that birchbark box home.

I wonder what Todd is going to do with these huge moose antlers. They can have a spread of up to six feed and weigh 80 pounds or more.

From the canoe workshop, I noticed a path along the lake that beckoned to me.

I could not resist hiking the same path that my ancestors did. We walked past a few other people doing the same thing.

The path took us along the lakeshore.

Eventually, opening into a clearing with a path down to a sandy beach.

Here, one can look, unconstrained, across time. Into the past, and perhaps into the future
I wasn’t quite ready to leave, but eventually, the mosquitoes convinced me otherwise.

Making our way back to the car, we noticed a lovely little picnic area, purchased a light lunch, and enjoyed ourselves immensely.
The road that traverses the park has several places to stop, though some are easy to miss.
“What’s that? Over there! Let’s stop!”
Poor Cousin Mark had at least one back-seat driver. Sorry Mark. I was so excited, and what we discovered next was the best part.

Secluded behind some trees, down a barely noticeable trail was what looked to be an abandoned Mi’kmaq camp.

Fortunately, there was a ranger who I think was very glad to have someone to explain things to. We were equally as grateful.

I spotted the wigwam and simply could not stop myself. It was calling to me.
I absolutely HAD to crawl in there, just like my ancestors did. Well, not just like they did because they were MUCH more agile.

I remembered my manners and asked if it would be alright, and yes, it was fine.

My cousins were kind and did not take a picture of me actually sort of crab-crawling inside, as I’m absolutely positive that I was no place near as graceful as my ancestors were.
In fact, I’m sure they were all collectively laughing from someplace over the lake.

I’m determined, though, and I made it.
I was simply gleeful. So, so, happy.

My cousins went back to discussing whatever they were discussing with the ranger, which gave me a chance to marvel at the experience.
This is the view that my Mi’kmaq ancestors woke up to every morning. Their front door.
People milling around outside – the village coming to life. Maybe children playing already.

I began to look around. The sides of the wigwam are waterproof.

Looking up and out through the center smoke hole.

Close up of the very top, where all of the poles join together in a cone. This is what every person woke up seeing, warm weather or cold.
During inclement weather, the hole was covered by a birchbark collar, which could also be adjusted for ventilation and heat regulation through side vents. You can read more, here.

The smoke hole is more than just for ventilation. It symbolizes the pathway of the soul, where the soul leaves the body and exits, tethering the earth and sky with the spirit realm.
Mom couldn’t come with me in person on this journey, given that she lives in the spirit world, so I wore her ring that descended from this side of her family. Here’s “Mom” in the wigwam on her ancestral land. Philippe’s wife was here, and so were her ancestors for time immemorial.
We’re home Mom.

The poles, with the hoops lashed to the poles along with the protective birchbark.
Reassembling the wigwam was the woman’s job. I can’t imagine accomplishing this in a day.

Hmmm, what’s that red thing, and what’s the ranger saying?
I can’t hear from here.
Should I embarrass myself and make an undignified exit?
Sooner or later, I have to.

As it turns out, this is a traditional Mi’kmaq game of chance called Waltes or Woltes. You can watch a champion player in a YouTube video, here.
That stunning wooden bowl is carved from the burl of a tree. The six beautiful moose or deer bone dice are carved on one side and rounded on the other. They are kept in that leather pouch when not in use.
The sticks are counting sticks. The goal is to win all of your opponents sticks by landing matching combinations of dice as the bowl is bounced against the blanket by players who take turns.
Having been played for thousands of years, Waltes is both cultural and has a spiritual aspect as well. It’s not only fun, but teaches counting, patience, and how to handle defeat. In earlier times, the bowl was often used by medicine men and women for divination and healing.
Of course, because it’s a game of chance, or more specifically, probability, wagers are sometimes involved too.

This is not a reproduction, but the real deal. No place did I find anything like this to purchase. I would have been happy with just one original piece.

Looking around the camp, I asked about this strange-looking skin. Turns out, it’s an eel’s skin lying on a pelt.
This is particularly relevant for Philippe and the Mi’kmaq people, given that they moved from the area near Tusket where they fished for eels during warm weather, to this interior lake in the fall and winter.

The benches were covered with furs and pelts, perhaps as they would have been displayed when trading.
The ranger explained how the skins and pelts were prepared, with the tools lying on the bench with the pelts.

Furs and pelts curing and drying.

Bearskin at the right, and I think the lighter pelt at left is caribou.

A log hollowed out for cooking.
Hunting and food preparation were a year-round affair.
When the tribe was encamped along the coastline, children collected eggs from the nests of seabirds, some of which were eaten as well. In season, berries, nuts, tree sap, and other plants supplemented their fare.
Fats and oils from moose and harbour seals were important dietary staples. Absolutely every part of the animal was utilized. Whatever couldn’t be eaten was used for clothing, utensils, or jewelry.
Moose bladders stored seal oil. Moose butter, a cherished treat, was rendered from boiled bones and marrow. Intestines were used for rope, or to stuff with a combination of meat, often organ meat, fat, and berries before smoking to preserve it for the lean winter months.
Salmon ran in the spring and fall. Sturgeon was caught at night by groups of men in canoes that would harpoon one fish and haul it to shore.
Moose were hunted mostly in the winter when snow slowed the animal, making it easier prey. Not only are moose huge animals, reaching from 5 to 7 feet at the shoulder, they also weigh from 600 to 1600 pounds, depending on their sex and age.
With bows, arrows, and lances, multiple men were required to harvest a moose, often having to track it for a day or more after it was initially wounded.
Meat was boiled, roasted, smoked or dried, depending on the season and if it was going to be eaten immediately or preserved for future use.
The Mi’kmaq people were not farmers. They were opportunistic hunters, but also tended to hunt certain things based on the moon under which it fell.
- January was for seal hunting.
- February and March were for beaver, otter, moose, bear, and caribou hunting.
- April ushered in smelt and gaspereau season, along with salmon and sturgeon. Children began gathering eggs.
- Fishing began in May and continued all summer.
- Roots and edible plants began to be gathered in June.
- July added berries to the diet, along with hunting partridge and pigeons.
- August was for rabbit hunting.
- They fished for eels in September.
- Snow began to fall in October, and hunting for ducks, moose, and beaver began and continued through November.
- December saw fishing for tomcod and the gathering of turtles.

Campfires, the center and heart of the community served many purposes and was tended primarily by the women. Fire, along with the other elements, is considered to be a living relative that transforms, cleanses and heals, and served many purposes. It was around the campfire that Elders passed on the sacred stories and laws.
Fire was also used for communal cooking. Men were responsible for procuring the meat. They would field-dress the animal to make it lighter or easier to transport, if necessary, but women were responsible for cleaning and preparing what the men brought home. Women also gathered berries and plants.
Aside from food, the women prepared hides for use or trade, including cleaning, brain-tanning, chewing them for softness, and sewing them into their final form.
Fire and heat are used for cooking, preparing hides and skins, rendering dyes, and, of course, for teaching, warmth and socializing.
Who doesn’t love to gather round a campfire?

I knew that our time had come to depart, but I didn’t want to leave.
One more walk to the lake to say “so long.” Not goodbye, because I’ll join them one day on that side of the spirit world.

Lifted by the wings of the sacred eagle.
Of all the locations and exhibits in Nova Scotia, our day at Kejimkujik was by far the most authentic, filled with a bone-deep spiritual connection and meaning. Knowing that my ancestors had unquestionably been here, stood here, slept here, and entered the spirit realm here made this a deeply personal experience.
They spent their winters on this lakeshore, and canoed on these waters. They loved, made love, and birthed babies here.
My ancestors. My family. For thousands of years.
I may not know her name, but I felt her presence. I can’t help but wonder what cut her time on earth so short. I hope she didn’t suffer.
Some 340 years later, I shared her world for a little bit, and I could almost, almost see through her eyes.

_____________________________________________________________
Share the Love!
You’re always welcome to forward articles or links to friends and share on social media.
Subscribe!
If you haven’t already subscribed, it’s free. You’ll receive an e-mail whenever I publish by clicking the “follow” button at the top of the main blog page, here.
Help Keep This Blog Free
I receive a small commission when you click a vendor link in my articles and purchase that item. This does NOT increase your price but helps me keep the lights on and this informational blog free for everyone. Please click on the affiliate links in the articles or to the vendors below if you are purchasing products or DNA testing.
Thank you so much.
DNA Purchases and Free Uploads
Genealogy Products and Services
My Books
Genealogy Books
Genealogy Research